Introduction: The Tiny Detail That Ruins a Clean Kitchen
You’ve cleaned everything. Counters wiped, floors shining, everything in place… and then your eyes land right there.
That awkward little gap between your kitchen cabinets.
It’s funny how something so small can suddenly feel so obvious—especially with light-colored cabinets. What once looked fresh and modern now has this sharp, distracting line that just won’t go unnoticed.
Here’s the good news: this is one of those simple home improvement hacks that takes less than 10 minutes… and makes a surprisingly big difference.
Why Cabinet Gaps Look So Bad (Even in Expensive Kitchens)
Cabinet gaps aren’t always a sign of poor quality.
In fact, even high-end kitchens have them.
👉 Quick answer: Cabinet gaps stand out because light reflects off exposed edges, creating visible contrast lines that draw the eye.
Over time:
- Wood shifts
- Doors slightly misalign
- Inner edges remain unpainted
And suddenly, that thin line becomes the first thing you notice.
The Marker & Tape Trick (The Easiest Fix You’ll Ever Try)
This is one of those budget-friendly DIY solutions that feels almost too simple—but it works.
What You Need
- Painter’s tape (or masking tape)
- A black permanent marker or furniture touch-up pen
- Optional: utility knife (for clean edges)
Step-by-Step Fix
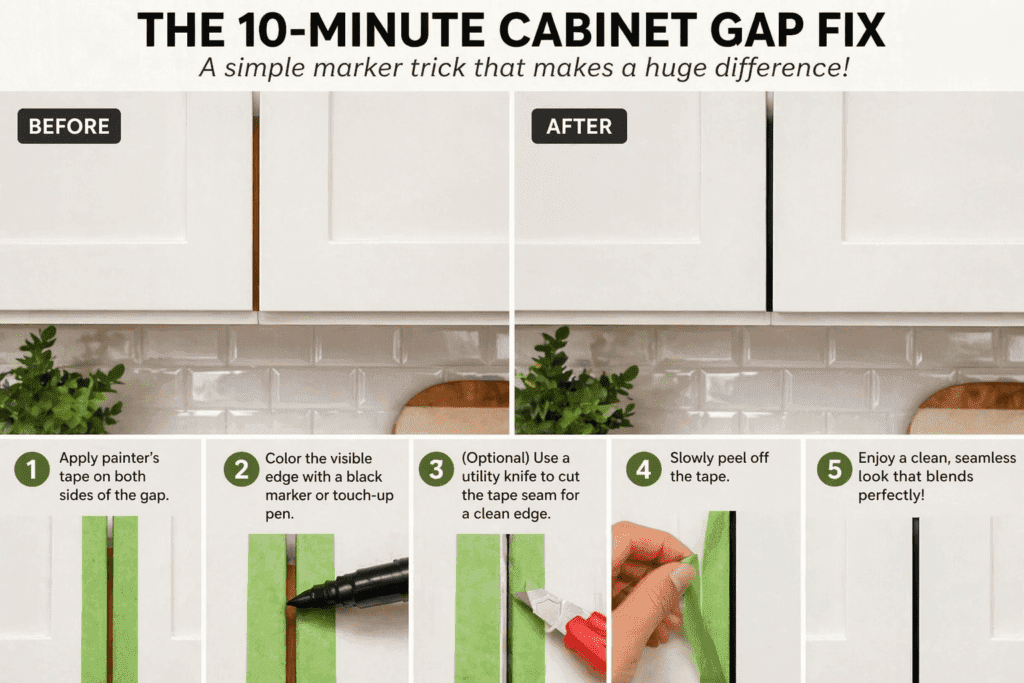
Step 1: Protect the Cabinet Surface
Apply painter’s tape along both sides of the gap.
Take your time here—press it down well so nothing bleeds through. This step is what keeps everything looking clean and professional.
Step 2: Color the Visible Edge
Use your marker or touch-up pen to color the inner edge of the cabinet where the gap shows.
Don’t go too deep—just cover what’s visible when the doors are closed.
Step 2.5 (Optional but Smart)
If your tape meets in the middle, lightly cut along the seam with a utility knife before removing it. This keeps the line sharp and prevents peeling.
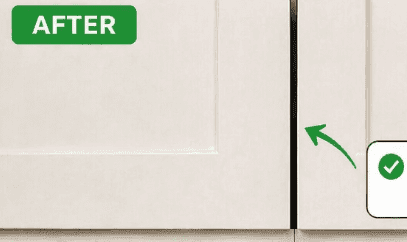
Step 3: Peel and Reveal
Slowly remove the tape.
What you’ll see is a subtle, shadow-like line instead of a bright, distracting gap.
👉 Quick answer: Darkening the gap creates a shadow effect, making it blend naturally with the cabinet design.
Why This Trick Works So Well
It’s all about how your eyes perceive contrast.
Before:
- Bright edges = high contrast = attention-grabbing
After:
- Darkened seam = natural shadow = visually “invisible”
Think of it like adding eyeliner—it doesn’t change the structure, but it brings everything together.
Want a More Durable Upgrade? Try These Options
If you’re looking for a long-term cabinet improvement solution, here are a few upgrades:
Furniture Touch-Up Pens
Designed specifically for cabinets, these last longer and come in multiple shades for a more precise match.
Cabinet Trim or Fillers
A more permanent fix. Thin strips can be added between cabinets for a built-in look.
Matching Paint
Using a small brush and cabinet paint gives a clean, lasting finish—but takes more time.
Real-Life Tips (So You Don’t Mess It Up)
- Always test the marker in a hidden spot first
- Don’t skip the tape—it’s what makes this look professional
- Avoid washable markers (they won’t last)
- Work slowly for clean lines
👉 Quick answer: Permanent marker + proper taping = best results for a clean, lasting finish.
Small Fix, Big Impact
This isn’t a full kitchen renovation.
It’s not expensive. It’s not complicated. And it definitely won’t take your whole weekend.
But once you do it… you’ll notice the difference every single time you walk into the room.
That tiny gap? Gone.
And suddenly, your kitchen doesn’t just look clean—it looks finished.
Conclusion: The Kind of Hack You’ll Wish You Knew Sooner
Some of the best home upgrades aren’t big projects—they’re smart, simple fixes.
This easy cabinet gap solution is one of those rare tricks that checks every box:
- Fast
- Affordable
- Renter-friendly
- Visually impactful
Try it once, and you’ll probably start noticing other little details you can improve just as e