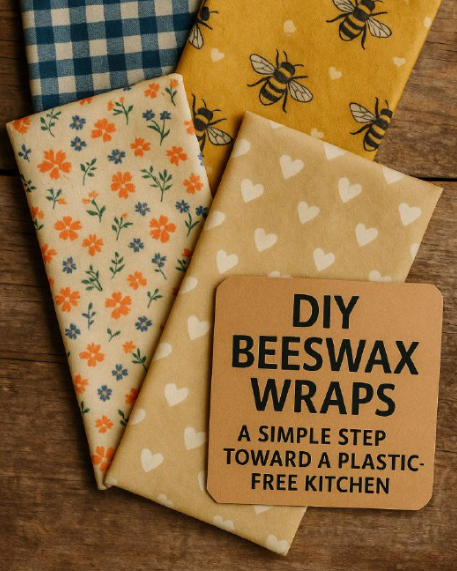
Want to cut back on plastic waste without sacrificing convenience? Beeswax wraps are the answer. These reusable, breathable wraps keep your food fresh, reduce your environmental impact, and look adorable in your kitchen. Best of all? You can make them at home in less than an hour.
With a few basic supplies and a little creativity, you can create eco-friendly wraps that replace plastic wrap and foil in your kitchen. Not only are they effective and beautiful, but they’re also a small action with a big impact on reducing waste. Let’s dive in!
Why Beeswax Wraps?
Plastic wrap is everywhere—easy to use but wasteful, non-biodegradable, and a big environmental burden. After a single use, it ends up in landfills, sometimes taking hundreds of years to break down. Meanwhile, beeswax wraps provide a sustainable and reusable solution that works just as well (if not better) than plastic.
Beeswax wraps are made from natural ingredients like beeswax, cotton fabric, and sometimes jojoba oil. They’re breathable, moldable with the warmth of your hands, and keep food fresh longer without the need for chemicals or harmful materials.
The best part? Once you get the hang of making them, they’re a fun and practical addition to your kitchen—plus, they make great eco-friendly gifts!
What You Need:
- 100% cotton fabric (cut into various sizes, depending on your needs)
- Beeswax pellets or grated beeswax (the key ingredient that gives your wraps their stickiness)
- Jojoba oil (optional, for added flexibility and moisture retention)
- Parchment paper (to protect your surfaces and help with the wax melting process)
- Old paintbrush (to spread the beeswax evenly)
- Iron or oven (two ways to melt the wax into the fabric)
How to Make Them
Iron Method:
- Preheat your iron to medium heat. No steam, just dry heat.
- Lay down parchment paper on your ironing board. Place your cotton fabric on top of the parchment paper.
- Sprinkle beeswax evenly over the fabric. You don’t need a lot—just enough to cover the fabric in a thin layer. If you’re adding jojoba oil for flexibility, mix a few drops into the beeswax before sprinkling.
- Cover the fabric with another piece of parchment paper. This prevents the wax from sticking to your iron.
- Iron gently over the parchment paper. Keep the iron moving in small circles until the wax melts and spreads evenly across the fabric. You’ll see the fabric absorb the wax.
- Peel off the wrap carefully once it’s done, and hang it to dry. Allow it to cool completely before using.
Oven Method:
If you prefer an oven method, here’s how:
- Preheat your oven to 200°F (90°C).
- Lay your fabric on a baking sheet lined with parchment paper.
- Sprinkle beeswax pellets evenly across the fabric, making sure it covers the entire area.
- Bake for 5-8 minutes, or until the wax has fully melted. Keep an eye on it to prevent overheating.
- Brush evenly with a paintbrush to ensure an even coating of beeswax.
- Hang to dry and cool before using.
How to Use Them:
- Wrap sandwiches, cheese, fruits, and leftovers to keep them fresh. The natural breathability of the wraps allows food to stay fresher longer compared to plastic wrap.
- Use the warmth of your hands to mold the wraps around containers, bowls, or snacks. They’ll stick together as they cool.
- Wash in cool water with mild soap. Avoid hot water or dishwashers, as they can damage the wax. After washing, let your wraps air dry and they’re ready for reuse!
Care Tip:
Beeswax wraps are amazing, but a few things will help them last longer. Do not use them with raw meat as they can’t be sanitized in the same way as plastic wrap. Also, avoid heat and direct sunlight to keep the wax from melting or degrading.
Bonus: Add Fun Patterns or Give Them as Eco-Gifts!
One of the best things about making your own beeswax wraps is the freedom to customize them. Pick fabrics with fun patterns or bold colors that suit your style. You can even gift these beautiful, eco-friendly wraps to friends and family for birthdays, holidays, or just because!
Final Thoughts:
Switching to beeswax wraps is a small action that can make a big impact on your environmental footprint. Not only do they help reduce plastic waste, but they also make a beautiful and functional addition to your kitchen. Once you try making and using them, you’ll wonder why you ever used plastic wrap in the first place.
Ready to ditch the plastic and make your own wraps? Your kitchen—and the planet—will thank you!