Your kitchen is the true heartbeat of your home. It’s where meals are made, conversations happen, and daily routines unfold. But over time, one of the most used and seen features—your kitchen cabinets—can lose their luster. Fingerprints, cooking grease, food splatters, and dust slowly build up, dulling their once-pristine shine.
Here’s the good news: you don’t need a full remodel to revitalize your kitchen. With the right methods, you can bring your cabinets back to life using effective, affordable, and safe techniques. From natural DIY solutions to practical maintenance habits, these 8 smart tips will help your kitchen cabinets sparkle like new—all without harsh chemicals or expensive products.
Why Cabinet Cleanliness Matters
Sparkling kitchen cabinets are more than just pleasing to the eye. They help maintain a clean and functional kitchen environment, prevent long-term damage from buildup, and protect your investment in your home’s interior. Cabinets that are left dirty for too long may begin to degrade or discolor, especially if made of wood or laminate.
Regular care doesn’t just improve appearance—it also extends the life of the material, making future deep cleaning easier and preserving the value of your home.
What You’ll Need Before You Start
To get started on restoring your cabinets, gather these essential tools and supplies:
- Microfiber cloths or soft cleaning rags
- A soft-bristle toothbrush or scrub brush
- White vinegar
- Baking soda
- Dish soap
- Coconut oil
- Lemon juice
- Olive oil
- Spray bottles
- Warm water
These household ingredients and tools are effective, budget-friendly, and gentle on cabinet surfaces.
1. Coconut Oil and Baking Soda: The Dynamic Duo for Grease
Grease is one of the most common culprits behind dull cabinets. Fortunately, you can tackle it naturally with a simple paste made from baking soda and coconut oil. The baking soda acts as a gentle scrubber, while the coconut oil breaks down sticky residue.
How to use it:
Mix equal parts of coconut oil and baking soda into a thick paste. Using a cloth or soft brush, apply it to greasy spots. Gently scrub in circular motions, then wipe clean with a damp cloth.
2. Vinegar and Water Spray for Tough Stains
Vinegar is a powerful natural cleaning agent and works wonders on greasy films and stubborn spots.
How to use it:
Mix equal parts white vinegar and warm water in a spray bottle. Spray the solution directly onto cabinet surfaces and let it sit for 2–3 minutes before wiping clean. For tougher stains, repeat as needed.
Avoid using vinegar on untreated or unsealed wood, as the acidity can damage the surface.
3. Lemon Juice and Olive Oil for Shine and Conditioning
Once your cabinets are clean, you can enhance their shine and nourish the wood by using a mix of lemon juice and olive oil. This solution helps cut lingering grease while restoring the wood’s natural sheen.
How to use it:
Combine 1 part lemon juice with 2 parts olive oil. Dip a soft cloth into the mixture and gently rub it into the cabinet surface. Buff in circular motions for a rich, polished finish.
4. Dish Soap and Warm Water for Routine Cleaning
Sometimes, simple is best. A basic mixture of dish soap and warm water is perfect for everyday cleaning and maintenance.
How to use it:
Mix a few drops of dish soap in a bowl of warm water. Dip a cloth or sponge into the solution and gently clean cabinet doors and handles. Rinse with clean water and dry thoroughly with a towel to prevent water spots.
This method is especially helpful for laminated or painted surfaces that need regular upkeep.
5. Toothpaste for Targeted Stain Removal
If you’ve got a tough mark or sticky patch that won’t budge, non-gel toothpaste can act as a mild abrasive that lifts grime without harming the finish.
How to use it:
Apply a pea-sized amount of toothpaste to the stain. Gently scrub with a soft-bristle toothbrush and then wipe clean with a damp cloth. This works well for crayon marks, ink stains, and discoloration near handles.
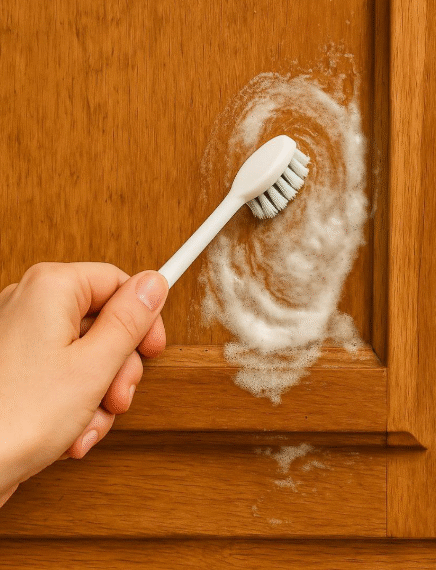
6. Deep Cleaning with Vinegar and Baking Soda Fizz
For a once-in-a-while deep clean, combine vinegar and baking soda for a foaming reaction that lifts dirt from nooks, crevices, and grooves.
How to use it:
Sprinkle baking soda over cabinet surfaces, especially near handles and trim. Then spray white vinegar over the area. Allow the mixture to fizz for a minute or two, then wipe clean with a damp cloth.
This technique is great for getting into corners and cleaning ornate cabinet details.
7. Evaluating Commercial Cleaners (Cautiously)
There are many commercial cleaners formulated specifically for kitchen cabinets, but not all are suitable for every material. Some contain strong solvents that can strip finishes or discolor wood.
What to consider:
- Always test on a small hidden area first.
- Look for non-toxic, wood-safe, and residue-free options.
- Avoid anything with bleach or ammonia, especially on stained or painted wood.
Natural alternatives often perform just as well—without the risk.
8. Make Cleaning a Habit, Not a Chore
The best way to keep your cabinets looking brand new is to build a simple, regular maintenance routine:
- Wipe cabinet surfaces weekly with a damp microfiber cloth
- Immediately clean up spills and splatters
- Avoid abrasive pads or steel wool
- Reapply oil-based polish every few months
- Clean handles and knobs frequently—they collect the most grime
Consistency is key. A few minutes each week can save hours of deep cleaning later.
Final Thoughts: Small Steps, Stunning Results
You don’t need expensive products, special tools, or a full renovation to breathe new life into your kitchen. With a little attention and these time-tested techniques, you can bring back the sparkle your cabinets once had—and keep it shining for years to come.
Remember, clean cabinets reflect more than light. They reflect your pride in your space, your attention to detail, and your desire for a home that truly feels welcoming.