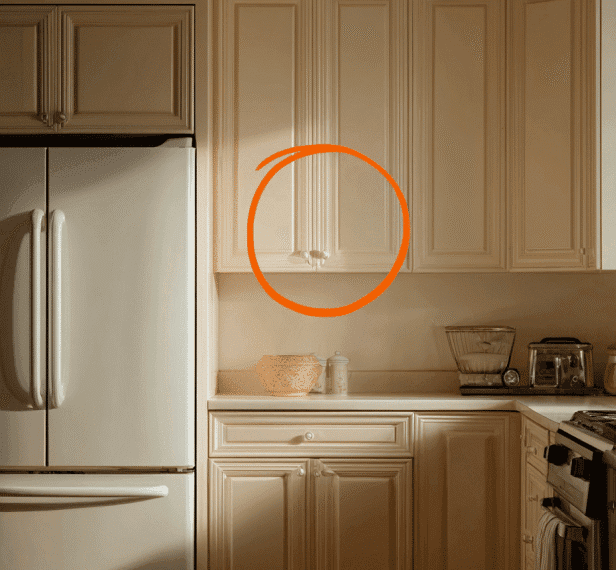
We’ve all been there: standing on tiptoes, peeking into that mysterious cupboard above the refrigerator or deep in the kitchen corner — the one we rarely open because it feels, well… useless.
But here’s a little secret: those awkward cupboards you’ve been ignoring might just be the storage superheroes your kitchen’s been missing.
With a sprinkle of creativity and some smart organization tricks, you can turn those “dead zones” into valuable, functional, and even beautiful spaces that make your home run smoother. Let’s dive in.
The Hidden Potential of “Useless” Cupboards
Every home has them — cupboards so high, deep, or awkwardly shaped that we’ve mentally written them off. But just because a space isn’t convenient doesn’t mean it’s without purpose.
Think of these cupboards as hidden treasure chests waiting to be rediscovered.
When used strategically, they can declutter countertops, free up prime cabinet real estate, and streamline daily life. And trust us — once you start organizing them, you’ll never look at your kitchen the same way again.
Step 1 – Understand the Space You Have
Before diving in, grab a measuring tape. Knowing your cupboard’s depth, height, and width helps you make smart decisions.
- Above the fridge: Often 12 inches high but deep — perfect for long or flat items.
- Corner cabinets: Deep but awkward. Think lazy Susans or slide-out shelves.
- Narrow side cupboards: Great for baking sheets, trays, or cutting boards.
📏 Pro Tip: Write down these measurements before buying containers or shelves. You’ll save time, money, and frustration.
Step 2 – Store Infrequently Used Appliances
That slow cooker you only pull out on holidays? The waffle maker you love but rarely use? These are prime candidates for high cupboards.
By moving seldom-used appliances to the “out of sight, out of mind” zone, you’ll free up accessible shelves for daily essentials like plates and cups. Bonus — your counters will instantly feel less crowded!
Step 3 – Organize with Bins and Baskets
Bins are the unsung heroes of kitchen organization. A set of clear plastic bins (12″ x 16″ is ideal) can turn chaotic cupboards into tidy, labeled sections.
Label each bin — “Holiday Baking,” “Small Appliances,” “Party Supplies.”
When you need something, just pull out the bin instead of emptying the whole cupboard. Easy, fast, frustration-free.
Step 4 – Utilize Vertical Space Like a Pro
Cupboards aren’t just about floor area — they’re about height! Add adjustable shelves or shelf risers to double your storage instantly.
You can even install tension rods or hooks to hang mugs, lids, or utensils. Suddenly, that single dusty shelf becomes a multi-level masterpiece of organization.
Step 5 – Store Bulk Items Efficiently
If you shop at warehouse stores, you’ll love this hack: use hard-to-reach cupboards for bulk goods like paper towels, extra cleaning supplies, or spare pantry items.
Keep them in stackable bins and label the front. That way, you can rotate stock easily — using older items first and preventing waste.
Step 6 – Create Seasonal Storage Zones
Holiday dishes, picnic baskets, and fondue pots don’t need daily real estate. Stash them above the fridge or deep in a corner cupboard.
Add a bright seasonal label (“Winter Decor” or “Summer BBQ”) so you’ll know exactly where to find them next year.
This method keeps your everyday cupboards neat while keeping seasonal items close at hand.
Step 7 – Safety and Accessibility Matter
Don’t sacrifice safety for storage. Keep heavy items low and use upper cupboards for lightweight things.
If you need to reach high spaces, invest in a sturdy step stool with rubber grips.
For deep cupboards, consider installing pull-out trays or a lazy Susan, so you can grab what you need without rearranging everything else.
Step 8 – Clever Hacks to Maximize Every Inch
It’s time to get creative!
- Add pegboards to the inside of cupboard doors for utensils or measuring spoons.
- Use magnetic strips to hold lids or knives.
- Slide in under-shelf baskets to create extra levels for small containers or spices.
Each little change adds up to major storage wins.
Step 9 – Choosing the Perfect Containers
The right containers make all the difference.
- Use square or rectangular containers to prevent wasted space.
- Choose clear, stackable, airtight designs for easy visibility and freshness.
- Avoid mixing too many shapes — uniformity looks cleaner and saves space.
💡 Pro Tip: Reuse glass jars or food containers to save money and reduce plastic waste.
Step 10 – Labeling and Categorizing
Labeling isn’t just for aesthetics — it’s a game changer for everyday efficiency.
Use a label maker or simple masking tape and a marker. Group items by function:
- “Baking Supplies”
- “Snacks”
- “Cleaning Gear”
This small step saves minutes every day and keeps your kitchen feeling orderly.
Step 11 – Mistakes to Avoid
We’ve all made them:
❌ Overloading cupboards until they groan.
❌ Forgetting to measure before buying containers.
❌ Storing heavy items up high.
Avoid these, and your storage system will last — and actually make your life easier.
Step 12 – Small Changes, Big Impact
Here’s the truth: transforming your kitchen doesn’t require a remodel.
By rethinking how you use those “useless” cupboards, you create space, reduce stress, and rediscover the joy of a well-organized home.
Imagine opening your cupboards and knowing exactly where everything is — that satisfying click of a door closing on a perfectly arranged space. That’s the magic of mindful organization.
Conclusion – Your Kitchen’s Hidden Gems Await
The cupboards you once ignored could be the most powerful part of your home’s organization system.
So grab a tape measure, a few bins, and a dash of creativity — and start transforming today.